Overview
What is Kubernetes (K8s)?
Kubernetes (K8s) is an open-source container orchestration platform that automates deployment, scaling, and management of containerized applications. It enables efficient resource utilization, high availability, and automated rollouts. K8s abstracts infrastructure complexities, making it easier to manage microservices and cloud-native applications across clusters in diverse environments.
What is RKE2?
RKE2 (Rancher Kubernetes Engine 2) is a lightweight, secure, and easy-to-deploy Kubernetes distribution optimized for enterprise environments. It enhances security with SELinux, CIS hardening, and containerd as the runtime. Designed for multi-cloud, edge, and on-premises deployments, RKE2 simplifies Kubernetes management while ensuring compliance and performance optimizations.
This guide will help you set up RKE2 in a 3-node cluster with basic configurations.
Preparation
We will set up RKE2 on three servers with the following hardware:
- 1 Master Node: 4 CPU, 8 GB RAM, 40 GB disk, 10 Gbps network
- 2 Agent Nodes: 4 CPU, 8 GB RAM, 40 GB disk, 10 Gbps network
Thanks to our sponsor OMZ Cloud for providing the infrastructure for this lab.
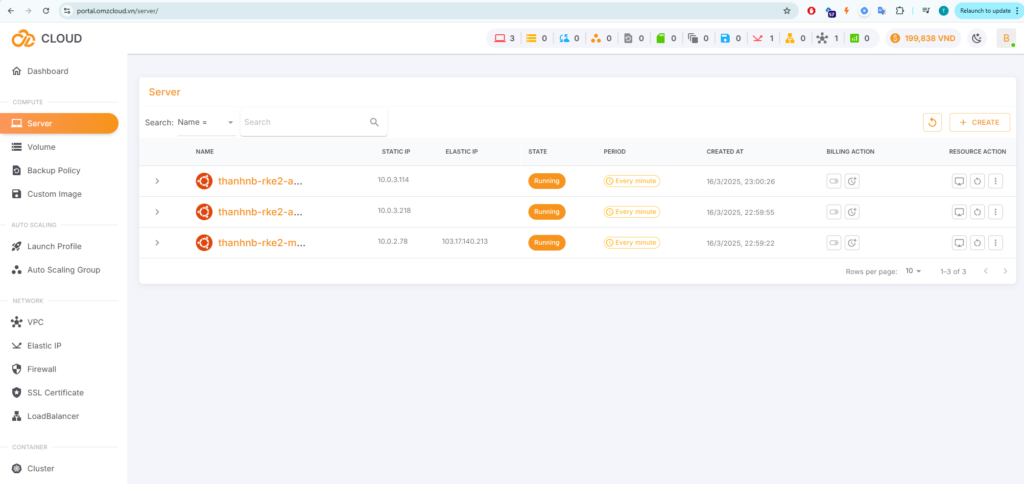
OMZ Cloud is a technology company providing cloud computing services, founded with the goal of creating a stable, simple, and internationally standardized cloud platform in Vietnam. The company is led by Vietnam’s top engineers, who have over 10 years of experience in information systems and cloud computing, as well as contributions to the world’s largest open-source projects (OpenStack, Ceph, Prometheus).
With the mission of “Accompanying, connecting, and unlocking the potential of organizations,” OMZ Cloud offers users a comprehensive cloud computing solution, including Cloud Server, Cloud Storage, Cloud Monitoring, Cloud Backup, and more. OMZ Cloud’s services are hosted in major Tier 3-certified data centers and designed with security standards compliant with ISO 27001. Notably, OMZ Cloud is the first provider in Vietnam to offer a pay-as-you-go billing model based on minutes used (Pay as you go MINUTES).
Learn more about OMZ Cloud’s products at: https://omzcloud.vn/
Architecture

Setup
Step 1: Setting Up the Master Node
1.1 SSH into the Master Node
systemctl stop ufw
systemctl disable ufw
hostnamectl set-hostname rancher-master
su -

1.2 Install RKE2 Server
curl -sfL https://get.rke2.io | INSTALL_RKE2_TYPE=server sh -

1.3 Enable and Start RKE2 Server
systemctl enable rke2-server.service
systemctl start rke2-server.service

1.4 Setup kubectl Command and Kubeconfig
ln -s $(find /var/lib/rancher/rke2/data/ -name kubectl) /usr/local/bin/kubectl
export KUBECONFIG=/etc/rancher/rke2/rke2.yaml

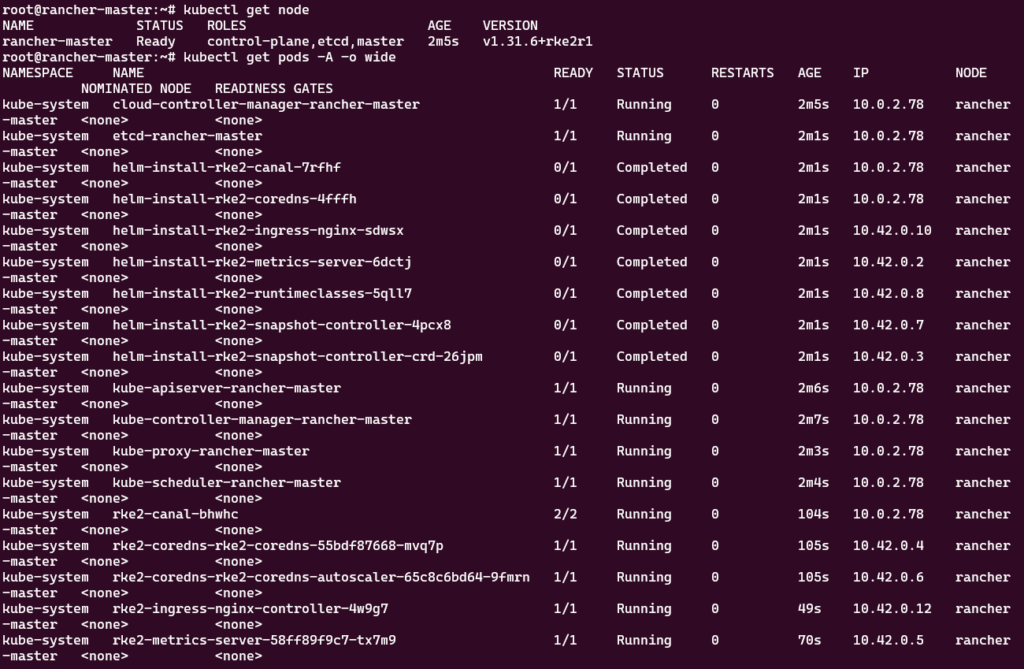
1.5 Check Node Status
kubectl get node
kubectl get pods -A -o wide
Wait about 10 minutes for the cluster to be fully up and running.
1.6 Deploy a Test Pod
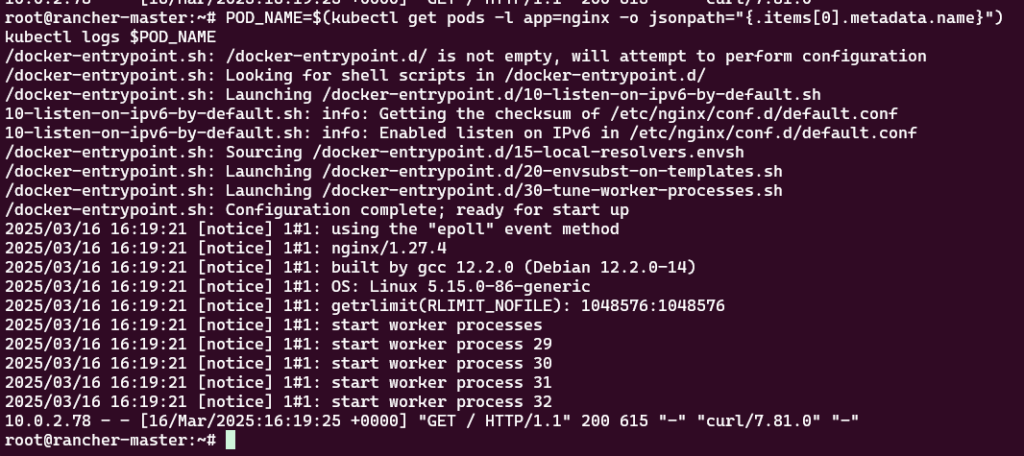
kubectl create deployment nginx --image=nginx
kubectl get pods -l app=nginx

kubectl expose deploy nginx --type=NodePort --port 80
PORT_NUMBER=$(kubectl get svc -l app=nginx -o jsonpath="{.items[0].spec.ports[0].nodePort}")

curl http://localhost:$PORT_NUMBER

1.7 Retrieve Node Token
cat /var/lib/rancher/rke2/server/node-token
The token will be used for adding agent nodes to the cluster.
root@rancher-master:~# cat /var/lib/rancher/rke2/server/node-token
K10a3062b5dbd31fba3cf781261a0707b3a08b7f440900e7e0bd6e820927d655dd9::server:a840da226d13c47fc5c50c6cc2cffb28
Step 2: Adding Agent Nodes to the Cluster
2.1 SSH into Agent Node 1
ssh [email protected]
2.2 Prepare the Agent Node
systemctl stop ufw
systemctl disable ufw
hostnamectl set-hostname rancher-agent01
su -

2.3 Install RKE2 Agent
curl -sfL https://get.rke2.io | INSTALL_RKE2_TYPE=agent sh -

2.4 Configure RKE2 Agent
mkdir -p /etc/rancher/rke2/
RKE2_SERVER_NODE_IP=10.0.2.78

# Set the RKE2 server address
echo "server: https://$RKE2_SERVER_NODE_IP:9345" > /etc/rancher/rke2/config.yaml

# Use the token retrieved from the master node
TOKEN=K10a3062b5dbd31fba3cf781261a0707b3a08b7f440900e7e0bd6e820927d655dd9::server:a840da226d13c47fc5c50c6cc2cffb28

echo "token: $TOKEN" >> /etc/rancher/rke2/config.yaml

2.5 Enable and Start RKE2 Agent
systemctl enable rke2-agent.service
systemctl start rke2-agent.service

2.6 Repeat Steps for Agent Node 2
ssh [email protected]
systemctl stop ufw
systemctl disable ufw
hostnamectl set-hostname rancher-agent02
su -
curl -sfL https://get.rke2.io | INSTALL_RKE2_TYPE=agent sh -
mkdir -p /etc/rancher/rke2/
RKE2_SERVER_NODE_IP=10.0.2.78

# Set the RKE2 server address
echo "server: https://$RKE2_SERVER_NODE_IP:9345" > /etc/rancher/rke2/config.yaml

# Use the token retrieved from the master node
TOKEN=K10a3062b5dbd31fba3cf781261a0707b3a08b7f440900e7e0bd6e820927d655dd9::server:a840da226d13c47fc5c50c6cc2cffb28

echo "token: $TOKEN" >> /etc/rancher/rke2/config.yaml

2.7 Enable and Start RKE2 Agent on Agent Node 2
systemctl enable rke2-agent.service
systemctl start rke2-agent.service

Step 3: Verify Cluster Nodes
After adding the agents, switch back to the master node and verify the cluster setup:
kubectl get node
You should see all three nodes (1 master, 2 agents) in the output.

Conclusion
By following this guide, you have successfully set up an RKE2 Kubernetes cluster with one master node and two agent nodes. You can now deploy applications and manage your Kubernetes environment efficiently.


Leave a Reply