

Phần 1. Chuẩn bị
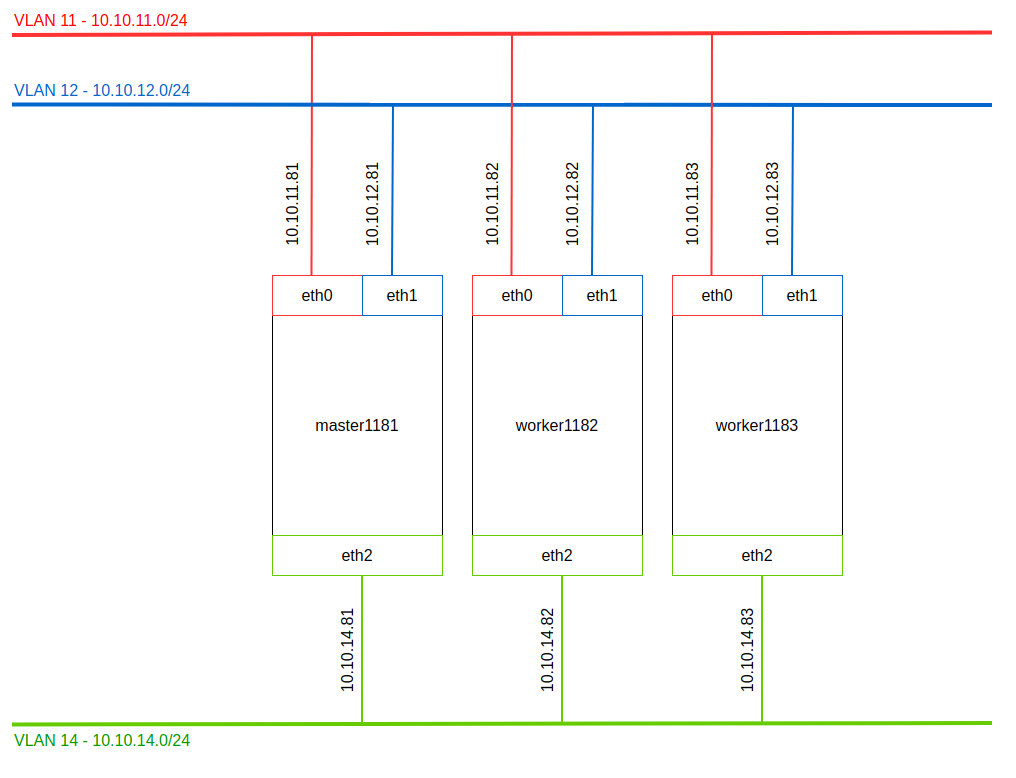
Quy hoạch

Mô hình
Phần 2. Chuẩn bị môi trường
Bước 1: Đặt hostname cho từng node
Thực hiện trên node Master 1181
hostnamectl set-hostname master1181
Thực hiện trên node Worker 1182
hostnamectl set-hostname worker1182
Thực hiện trên node Worker 1183
hostnamectl set-hostname worker1183
Bước 2: Chuẩn bị môi trường triển khai
Thực hiện trên tất cả các node
Tắt SELinux, Firewall
sed -i 's/SELINUX=enforcing/SELINUX=disabled/g' /etc/sysconfig/selinux
sed -i 's/SELINUX=enforcing/SELINUX=disabled/g' /etc/selinux/config
systemctl stop firewalld
systemctl disable firewalld
Cấu hình đồng bộ thời gian
timedatectl set-timezone Asia/Ho_Chi_Minh

yum -y install chrony
systemctl enable chronyd.service
systemctl restart chronyd.service
chronyc sources
Disable swap
sudo sed -i '/swap/d' /etc/fstab
sudo swapoff -a
Cài đặt môi trường Docker
curl -fsSL https://get.docker.com/ | sh
sudo systemctl start docker
sudo systemctl status docker
sudo systemctl enable docker
Bổ sung cấu hình net filter
sudo modprobe br_netfilter
cat <<EOF | sudo tee /etc/sysctl.d/k8s.conf
net.bridge.bridge-nf-call-ip6tables = 1
net.bridge.bridge-nf-call-iptables = 1
EOF
sudo sysctl --system
Cấu hình file host
echo "
10.10.11.81 master1181
10.10.11.82 worker1182
10.10.11.83 worker1183" >> /etc/hosts
Khởi động lại (Tại bước này nên snapshot lại)
init 6
Phần 3. Khởi tạo Cluster Kubernetes
Bước 1: Cài đặt các gói cần thiết
Thực hiện trên tất cả các node
Thiết lập repo k8s
cat <<EOF | sudo tee /etc/yum.repos.d/kubernetes.repo
[kubernetes]
name=Kubernetes baseurl=https://packages.cloud.google.com/yum/repos/kubernetes-el7-\$basearch enabled=1 gpgcheck=1 repo_gpgcheck=1 gpgkey=https://packages.cloud.google.com/yum/doc/yum-key.gpg https://packages.cloud.google.com/yum/doc/rpm-package-key.gpg exclude=kubelet kubeadm kubectl EOF
Cài đặt kubelet kubeadm kubectl
Lưu ý:
- docker: để làm môi trường chạy các container.
- kubeadm: Công cụ khởi tạo Cluster k8s.
- kubelet: Thành phần chạy trên các host, có nhiệm vụ kích hoạt các pod và container trong cụm Cluser của K8S.
- kubectl: Công cụ CLI (Giao diện dòng lệnh) để tương tác với K8s.
sudo yum install -y kubelet kubeadm kubectl --disableexcludes=kubernetes
sudo systemctl enable --now kubelet
Bước 2: Khởi tạo Cluster
Thực hiện trên node master
Khởi tạo Cluster
sudo kubeadm init --apiserver-advertise-address 10.10.11.81 --pod-network-cidr=10.244.0.0/16
Lưu ý:
--apiserver-advertise-address: Địa chỉ của node Master--pod-network-cidr: Dải địa chỉ sử dụng, phụ thuộc vào công nghệ sử dụng, trong bài sử dụng công nghệ networkflannelnên giá trị bằng10.244.0.0/16
Kết quả
[root@master1181 ~]# sudo kubeadm init --apiserver-advertise-address 10.10.11.81 --pod-network-cidr=10.244.0.0/16
W1015 19:19:17.662622    1680 configset.go:348] WARNING: kubeadm cannot validate component configs for API groups [kubelet.config.k8s.io kubeproxy.config.k8s.io]
[init] Using Kubernetes version: v1.19.3
[preflight] Running pre-flight checks
	[WARNING IsDockerSystemdCheck]: detected "cgroupfs" as the Docker cgroup driver. The recommended driver is "systemd". Please follow the guide at https://kubernetes.io/docs/setup/cri/
[preflight] Pulling images required for setting up a Kubernetes cluster
[preflight] This might take a minute or two, depending on the speed of your internet connection
[preflight] You can also perform this action in beforehand using 'kubeadm config images pull'
[certs] Using certificateDir folder "/etc/kubernetes/pki"
[certs] Generating "ca" certificate and key
[certs] Generating "apiserver" certificate and key
[certs] apiserver serving cert is signed for DNS names [kubernetes kubernetes.default kubernetes.default.svc kubernetes.default.svc.cluster.local master1181] and IPs [10.96.0.1 10.10.11.81]
[certs] Generating "apiserver-kubelet-client" certificate and key
[certs] Generating "front-proxy-ca" certificate and key
[certs] Generating "front-proxy-client" certificate and key
[certs] Generating "etcd/ca" certificate and key
[certs] Generating "etcd/server" certificate and key
[certs] etcd/server serving cert is signed for DNS names [localhost master1181] and IPs [10.10.11.81 127.0.0.1 ::1]
[certs] Generating "etcd/peer" certificate and key
[certs] etcd/peer serving cert is signed for DNS names [localhost master1181] and IPs [10.10.11.81 127.0.0.1 ::1]
[certs] Generating "etcd/healthcheck-client" certificate and key
[certs] Generating "apiserver-etcd-client" certificate and key
[certs] Generating "sa" key and public key
[kubeconfig] Using kubeconfig folder "/etc/kubernetes"
[kubeconfig] Writing "admin.conf" kubeconfig file
[kubeconfig] Writing "kubelet.conf" kubeconfig file
[kubeconfig] Writing "controller-manager.conf" kubeconfig file
[kubeconfig] Writing "scheduler.conf" kubeconfig file
[kubelet-start] Writing kubelet environment file with flags to file "/var/lib/kubelet/kubeadm-flags.env"
[kubelet-start] Writing kubelet configuration to file "/var/lib/kubelet/config.yaml"
[kubelet-start] Starting the kubelet
[control-plane] Using manifest folder "/etc/kubernetes/manifests"
[control-plane] Creating static Pod manifest for "kube-apiserver"
[control-plane] Creating static Pod manifest for "kube-controller-manager"
[control-plane] Creating static Pod manifest for "kube-scheduler"
[etcd] Creating static Pod manifest for local etcd in "/etc/kubernetes/manifests"
[wait-control-plane] Waiting for the kubelet to boot up the control plane as static Pods from directory "/etc/kubernetes/manifests". This can take up to 4m0s
[apiclient] All control plane components are healthy after 22.006207 seconds
[upload-config] Storing the configuration used in ConfigMap "kubeadm-config" in the "kube-system" Namespace
[kubelet] Creating a ConfigMap "kubelet-config-1.19" in namespace kube-system with the configuration for the kubelets in the cluster
[upload-certs] Skipping phase. Please see --upload-certs
[mark-control-plane] Marking the node master1181 as control-plane by adding the label "node-role.kubernetes.io/master=''"
[mark-control-plane] Marking the node master1181 as control-plane by adding the taints [node-role.kubernetes.io/master:NoSchedule]
[bootstrap-token] Using token: yfn8mf.5yckeekleb0yp8m2
[bootstrap-token] Configuring bootstrap tokens, cluster-info ConfigMap, RBAC Roles
[bootstrap-token] configured RBAC rules to allow Node Bootstrap tokens to get nodes
[bootstrap-token] configured RBAC rules to allow Node Bootstrap tokens to post CSRs in order for nodes to get long term certificate credentials
[bootstrap-token] configured RBAC rules to allow the csrapprover controller automatically approve CSRs from a Node Bootstrap Token
[bootstrap-token] configured RBAC rules to allow certificate rotation for all node client certificates in the cluster
[bootstrap-token] Creating the "cluster-info" ConfigMap in the "kube-public" namespace
[kubelet-finalize] Updating "/etc/kubernetes/kubelet.conf" to point to a rotatable kubelet client certificate and key
[addons] Applied essential addon: CoreDNS
[addons] Applied essential addon: kube-proxy

Your Kubernetes control-plane has initialized successfully!

To start using your cluster, you need to run the following as a regular user:

  mkdir -p $HOME/.kube
  sudo cp -i /etc/kubernetes/admin.conf $HOME/.kube/config
  sudo chown $(id -u):$(id -g) $HOME/.kube/config

You should now deploy a pod network to the cluster.
Run "kubectl apply -f [podnetwork].yaml" with one of the options listed at:
  https://kubernetes.io/docs/concepts/cluster-administration/addons/

Then you can join any number of worker nodes by running the following on each as root:

kubeadm join 10.10.11.81:6443 --token yfn8mf.5yckeekleb0yp8m2 \
    --discovery-token-ca-cert-hash sha256:935f610b57d3c170c9849402bef83226258610535b96823e421c20bdc2f83ce2
Lưu ý, ta sẽ dùng câu lệnh này để join càc worker vào cluster k8s
kubeadm join 10.10.11.81:6443 --token yfn8mf.5yckeekleb0yp8m2 \
    --discovery-token-ca-cert-hash sha256:935f610b57d3c170c9849402bef83226258610535b96823e421c20bdc2f83ce2
Khởi tạo ENV để sử dụng câu lệnh kubectl
mkdir -p $HOME/.kube
sudo cp -i /etc/kubernetes/admin.conf $HOME/.kube/config
sudo chown $(id -u):$(id -g) $HOME/.kube/config
Cấu hình Pod Network, trong bài sẽ sử dụng công nghệ flannel
kubectl apply -f https://raw.githubusercontent.com/coreos/flannel/master/Documentation/kube-flannel.yml
Kết quả
[root@master1181 ~]# kubectl apply -f https://raw.githubusercontent.com/coreos/flannel/master/Documentation/kube-flannel.yml

podsecuritypolicy.policy/psp.flannel.unprivileged created
Warning: rbac.authorization.k8s.io/v1beta1 ClusterRole is deprecated in v1.17+, unavailable in v1.22+; use rbac.authorization.k8s.io/v1 ClusterRole
clusterrole.rbac.authorization.k8s.io/flannel created
Warning: rbac.authorization.k8s.io/v1beta1 ClusterRoleBinding is deprecated in v1.17+, unavailable in v1.22+; use rbac.authorization.k8s.io/v1 ClusterRoleBinding
clusterrolebinding.rbac.authorization.k8s.io/flannel created
serviceaccount/flannel created
configmap/kube-flannel-cfg created
daemonset.apps/kube-flannel-ds created
Bước 3: Join worker vào Cluster
Thực hiện trên worker1182, worker1183
Thực hiện lần lượt trên worker1182, worker1183
kubeadm join 10.10.11.81:6443 --token yfn8mf.5yckeekleb0yp8m2 \
    --discovery-token-ca-cert-hash sha256:935f610b57d3c170c9849402bef83226258610535b96823e421c20bdc2f83ce2
Kết quả:
[root@worker1182 ~]# kubeadm join 10.10.11.81:6443 --token yfn8mf.5yckeekleb0yp8m2 \
>     --discovery-token-ca-cert-hash sha256:935f610b57d3c170c9849402bef83226258610535b96823e421c20bdc2f83ce2
[preflight] Running pre-flight checks
	[WARNING IsDockerSystemdCheck]: detected "cgroupfs" as the Docker cgroup driver. The recommended driver is "systemd". Please follow the guide at https://kubernetes.io/docs/setup/cri/
[preflight] Reading configuration from the cluster...
[preflight] FYI: You can look at this config file with 'kubectl -n kube-system get cm kubeadm-config -oyaml'
[kubelet-start] Writing kubelet configuration to file "/var/lib/kubelet/config.yaml"
[kubelet-start] Writing kubelet environment file with flags to file "/var/lib/kubelet/kubeadm-flags.env"
[kubelet-start] Starting the kubelet
[kubelet-start] Waiting for the kubelet to perform the TLS Bootstrap...

This node has joined the cluster:
* Certificate signing request was sent to apiserver and a response was received.
* The Kubelet was informed of the new secure connection details.

Run 'kubectl get nodes' on the control-plane to see this node join the cluster.


[root@worker1183 ~]# kubeadm join 10.10.11.81:6443 --token yfn8mf.5yckeekleb0yp8m2 \
>     --discovery-token-ca-cert-hash sha256:935f610b57d3c170c9849402bef83226258610535b96823e421c20bdc2f83ce2
[preflight] Running pre-flight checks
	[WARNING IsDockerSystemdCheck]: detected "cgroupfs" as the Docker cgroup driver. The recommended driver is "systemd". Please follow the guide at https://kubernetes.io/docs/setup/cri/
[preflight] Reading configuration from the cluster...
[preflight] FYI: You can look at this config file with 'kubectl -n kube-system get cm kubeadm-config -oyaml'
[kubelet-start] Writing kubelet configuration to file "/var/lib/kubelet/config.yaml"
[kubelet-start] Writing kubelet environment file with flags to file "/var/lib/kubelet/kubeadm-flags.env"
[kubelet-start] Starting the kubelet
[kubelet-start] Waiting for the kubelet to perform the TLS Bootstrap...

This node has joined the cluster:
* Certificate signing request was sent to apiserver and a response was received.
* The Kubelet was informed of the new secure connection details.

Run 'kubectl get nodes' on the control-plane to see this node join the cluster.
Kiểm tra lại trên node master1181
[root@master1181 ~]# kubectl get nodes
NAME         STATUS   ROLES    AGE   VERSION
master1181   Ready    master   11m   v1.19.3
worker1182   Ready    <none>   77s   v1.19.3
worker1183   Ready    <none>   73s   v1.19.3
Phần 4. Join worker vào cluster
Bước 1: Sinh câu lệnh join woker
Thực hiện trên node master1181
Thực hiện
sudo kubeadm token create --print-join-command
Kết quả
[root@master1181 ~]# sudo kubeadm token create --print-join-command
W1015 20:24:23.607760   27097 configset.go:348] WARNING: kubeadm cannot validate component configs for API groups [kubelet.config.k8s.io kubeproxy.config.k8s.io]
kubeadm join 10.10.11.81:6443 --token yfn8mf.5yckeekleb0yp8m2     --discovery-token-ca-cert-hash sha256:935f610b57d3c170c9849402bef83226258610535b96823e421c20bdc2f83ce2
Bước 2: Thực hiện câu lệnh trên từng node worker
kubeadm join 10.10.11.81:6443 --token yfn8mf.5yckeekleb0yp8m2 \
    --discovery-token-ca-cert-hash sha256:935f610b57d3c170c9849402bef83226258610535b96823e421c20bdc2f83ce2
Kết quả
[root@worker1182 ~]# kubeadm join 10.10.11.81:6443 --token yfn8mf.5yckeekleb0yp8m2 \
>     --discovery-token-ca-cert-hash sha256:935f610b57d3c170c9849402bef83226258610535b96823e421c20bdc2f83ce2
[preflight] Running pre-flight checks
	[WARNING IsDockerSystemdCheck]: detected "cgroupfs" as the Docker cgroup driver. The recommended driver is "systemd". Please follow the guide at https://kubernetes.io/docs/setup/cri/
[preflight] Reading configuration from the cluster...
[preflight] FYI: You can look at this config file with 'kubectl -n kube-system get cm kubeadm-config -oyaml'
[kubelet-start] Writing kubelet configuration to file "/var/lib/kubelet/config.yaml"
[kubelet-start] Writing kubelet environment file with flags to file "/var/lib/kubelet/kubeadm-flags.env"
[kubelet-start] Starting the kubelet
[kubelet-start] Waiting for the kubelet to perform the TLS Bootstrap...

This node has joined the cluster:
* Certificate signing request was sent to apiserver and a response was received.
* The Kubelet was informed of the new secure connection details.

Run 'kubectl get nodes' on the control-plane to see this node join the cluster.

[root@worker1183 ~]# kubeadm join 10.10.11.81:6443 --token yfn8mf.5yckeekleb0yp8m2 \
>     --discovery-token-ca-cert-hash sha256:935f610b57d3c170c9849402bef83226258610535b96823e421c20bdc2f83ce2
[preflight] Running pre-flight checks
	[WARNING IsDockerSystemdCheck]: detected "cgroupfs" as the Docker cgroup driver. The recommended driver is "systemd". Please follow the guide at https://kubernetes.io/docs/setup/cri/
[preflight] Reading configuration from the cluster...
[preflight] FYI: You can look at this config file with 'kubectl -n kube-system get cm kubeadm-config -oyaml'
[kubelet-start] Writing kubelet configuration to file "/var/lib/kubelet/config.yaml"
[kubelet-start] Writing kubelet environment file with flags to file "/var/lib/kubelet/kubeadm-flags.env"
[kubelet-start] Starting the kubelet
[kubelet-start] Waiting for the kubelet to perform the TLS Bootstrap...

This node has joined the cluster:
* Certificate signing request was sent to apiserver and a response was received.
* The Kubelet was informed of the new secure connection details.

Run 'kubectl get nodes' on the control-plane to see this node join the cluster.
Bước 3: Kiểm tra tại node master1181
[root@master1181 ~]# kubectl get nodes
NAME         STATUS   ROLES    AGE     VERSION
master1181   Ready    master   7m46s   v1.19.3
worker1182   Ready    <none>   46s     v1.19.3
worker1183   Ready    <none>   43s     v1.19.3

[root@master1181 ~]# kubectl get pod --all-namespaces
NAMESPACE     NAME                                 READY   STATUS    RESTARTS   AGE
kube-system   coredns-f9fd979d6-wwbz9              1/1     Running   0          7m35s
kube-system   coredns-f9fd979d6-x28f7              1/1     Running   0          7m35s
kube-system   etcd-master1181                      1/1     Running   0          7m45s
kube-system   kube-apiserver-master1181            1/1     Running   0          7m45s
kube-system   kube-controller-manager-master1181   1/1     Running   0          7m45s
kube-system   kube-flannel-ds-mjcgd                1/1     Running   0          56s
kube-system   kube-flannel-ds-rm5sk                1/1     Running   0          2m19s
kube-system   kube-flannel-ds-vrwpz                1/1     Running   0          53s
kube-system   kube-proxy-b7b9t                     1/1     Running   0          7m35s
kube-system   kube-proxy-fdmlr                     1/1     Running   0          53s
kube-system   kube-proxy-nx5nq                     1/1     Running   0          56s
kube-system   kube-scheduler-master1181            1/1     Running   0          7m45s
Phần 5: Triển khai ứng dụng demo
Thực hiện trên master1181
Tạo mới file hello-app.yml với nội dung
apiVersion: apps/v1
kind: Deployment
metadata:
  name: hello-app
spec:
  replicas: 2
  selector:
    matchLabels:
      app: hello-app
  template:
    metadata:
      labels:
        app: hello-app
    spec:
      containers:
      - image: gcr.io/google-samples/hello-app:1.0
        imagePullPolicy: Always
        name: hello-app
        ports:
        - containerPort: 8080
---
apiVersion: v1
kind: Service
metadata:
  name: hello-app
spec:
  type: NodePort
  ports:
    - port: 8080
      targetPort: 8080
      nodePort: 30001
      protocol: TCP
  selector:
    app: hello-app
Thực hiện deploy ứng dụng
kubectl create -f hello-app.yml
Kết quả
[root@master1181 ~]# kubectl create -f hello-app.yml
deployment.apps/hello-app created
service/hello-app created
Kiểm tra
kubectl get deployments hello-app
kubectl describe deployments hello-app
kubectl get replicasets
kubectl describe replicasets
kubectl get services hello-app
Kết quả
[root@master1181 ~]# kubectl get deployments hello-app
NAME        READY   UP-TO-DATE   AVAILABLE   AGE
hello-app   2/2     2            2           25s
[root@master1181 ~]# kubectl describe deployments hello-app
Name:                   hello-app
Namespace:              default
CreationTimestamp:      Thu, 15 Oct 2020 19:39:29 +0700
Labels:                 <none>
Annotations:            deployment.kubernetes.io/revision: 1
Selector:               app=hello-app
Replicas:               2 desired | 2 updated | 2 total | 2 available | 0 unavailable
StrategyType:           RollingUpdate
MinReadySeconds:        0
RollingUpdateStrategy:  25% max unavailable, 25% max surge
Pod Template:
  Labels:  app=hello-app
  Containers:
   hello-app:
    Image:        gcr.io/google-samples/hello-app:1.0
    Port:         8080/TCP
    Host Port:    0/TCP
    Environment:  <none>
    Mounts:       <none>
  Volumes:        <none>
Conditions:
  Type           Status  Reason
  ----           ------  ------
  Available      True    MinimumReplicasAvailable
  Progressing    True    NewReplicaSetAvailable
OldReplicaSets:  <none>
NewReplicaSet:   hello-app-59cb9bf65 (2/2 replicas created)
Events:
  Type    Reason             Age   From                   Message
  ----    ------             ----  ----                   -------
  Normal  ScalingReplicaSet  30s   deployment-controller  Scaled up replica set hello-app-59cb9bf65 to 2
[root@master1181 ~]# kubectl get replicasets
NAME                  DESIRED   CURRENT   READY   AGE
hello-app-59cb9bf65   2         2         2       34s
[root@master1181 ~]# kubectl describe replicasets
Name:           hello-app-59cb9bf65
Namespace:      default
Selector:       app=hello-app,pod-template-hash=59cb9bf65
Labels:         app=hello-app
                pod-template-hash=59cb9bf65
Annotations:    deployment.kubernetes.io/desired-replicas: 2
                deployment.kubernetes.io/max-replicas: 3
                deployment.kubernetes.io/revision: 1
Controlled By:  Deployment/hello-app
Replicas:       2 current / 2 desired
Pods Status:    2 Running / 0 Waiting / 0 Succeeded / 0 Failed
Pod Template:
  Labels:  app=hello-app
           pod-template-hash=59cb9bf65
  Containers:
   hello-app:
    Image:        gcr.io/google-samples/hello-app:1.0
    Port:         8080/TCP
    Host Port:    0/TCP
    Environment:  <none>
    Mounts:       <none>
  Volumes:        <none>
Events:
  Type    Reason            Age   From                   Message
  ----    ------            ----  ----                   -------
  Normal  SuccessfulCreate  41s   replicaset-controller  Created pod: hello-app-59cb9bf65-p2kz9
  Normal  SuccessfulCreate  41s   replicaset-controller  Created pod: hello-app-59cb9bf65-cx6kg
[root@master1181 ~]# kubectl get services hello-app
NAME        TYPE       CLUSTER-IP      EXTERNAL-IP   PORT(S)          AGE
hello-app   NodePort   10.98.138.202   <none>        8080:30001/TCP   47s
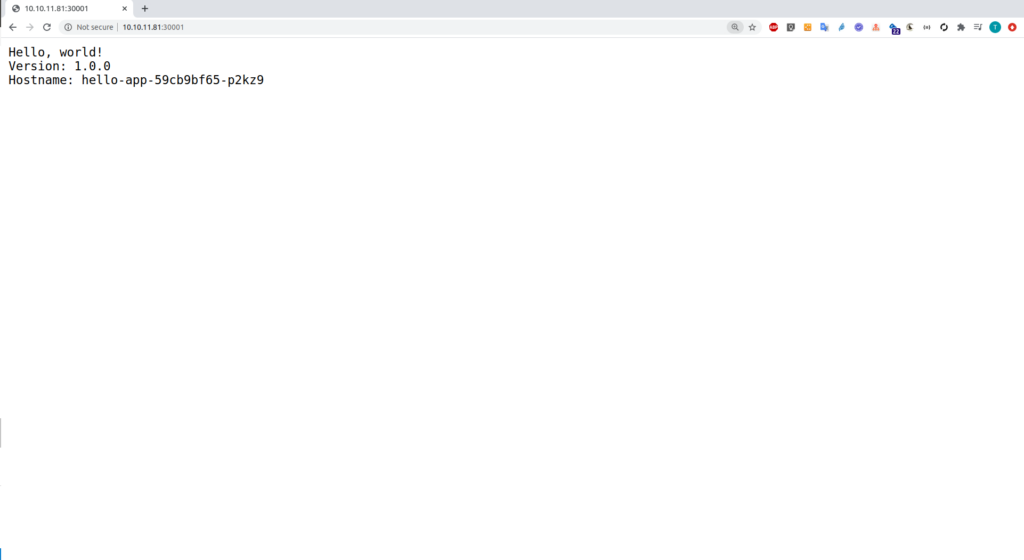
Truy cập web với đường dẫn http://10.10.11.81:30001/, http://10.10.11.82:30001/, http://10.10.11.83:30001/
Kết quả
Leave a Reply